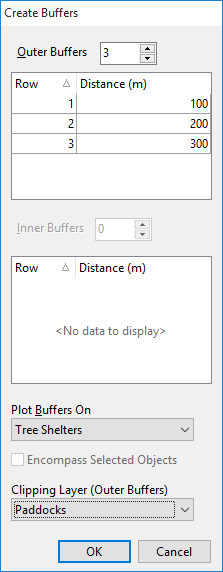
Buffers are shapes created around or inside objects at a specified distance. These can be used for spray buffers, stock watering distances, clearing stand-off's to water courses etc. To create buffers:
•Select the object/s on which you wish to create buffers. To apply buffers to any number of objects simultaneously hold down the Ctrl key and the A key to select all objects on that layer or right mouse click and click on Select All. You can also manually select a group of objects by holding down the Ctrl key and left mouse clicking on each object. All objects selected are outlined in red.
•Click the Create Buffers button on the toolbar 
•At the top of the Create Buffers window type in the number of Outer Buffers to create (if any). A row is created below it for each number of buffers. Type in the distance for each buffer with the distance being from the original object.

•Type in the number of Inner buffers to create (if any). As previous, a row is created below it for each number of buffers. Type in the distance for each buffer with the distance being from the original object.
•Next select a layer on which to create the buffers. Click on the drop down arrow for Plot Buffers On to select an existing layer. As buffers are polygons they will need to be created on a polygon layer, therefore only existing polygon layers are displayed in the drop down list. There is also an option to <<Create new layer>>. Select this option to create a new layer. When you select this option you will be asked to give the new layer a name. Enter a name and click OK.
•There is an Encompass Selected Objects option. If you have multiple objects selected, tick this option to create the same buffers around all the selected objects. If you do not tick this option, it will create separate buffers around each object.
•The Clipping Layer (Outer Buffers) will clip a buffer to a corresponding object on another layer. Typically this would be used to create grazing pressure zones for watering points.
•When finished click OK.
NB: If you are using the Clipping Layer function, you can perform this on multiple points at a time ONLY if there is one point per polygon (paddock) that is being clipped to. If there are multiple points that are intended to be clipped to the same polygon then these will need to be done separate to other clipped areas. Select the points that are contained in that one polygon and tick the Encompass function.