|
Navigation: Livestock > Individual Animals > Recording Animal Activities > Transactions > Births Create progeny and record Dam and/or Sire for the progeny |
Scroll Prev Top Next More |
There are two methods available to create progeny and record Dam and/or Sire for the progeny:
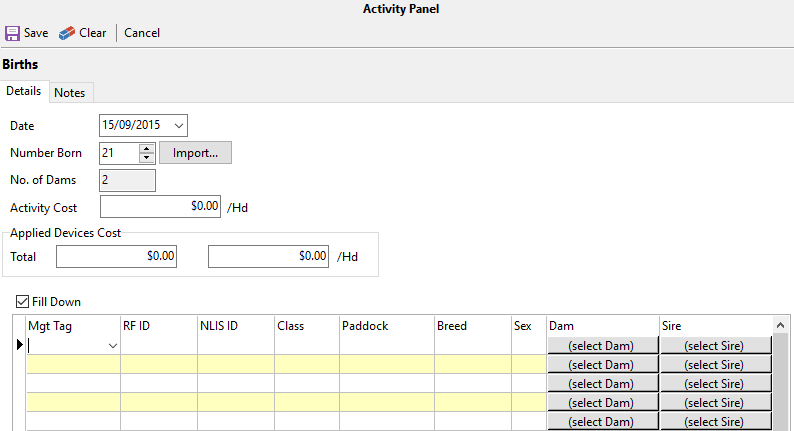
•Click •The Births entry screen is displayed in the Activity Panel.
•Select the date and enter Number Born. •The Grid below has a row for each animal. •If you attribute a device/identifier in this birth process, you can add the cost of the identifier in this birth process. •In the grid below you can click in any of the three identifier cells to apply devices. •Select Class and Paddock from the drop-down list by clicking on the respective cell. NOTE that it will Auto-fill Down for all the animals. If any of these need to be edited, untick the Auto-fill Down for individual editing. •Select Breed and Sex from the drop-down lists (These fields are optional). Again, note the Auto-fill Down. •To select Dam and Sire, click on the corresponding cell to launch the Dam/Sire selection window.
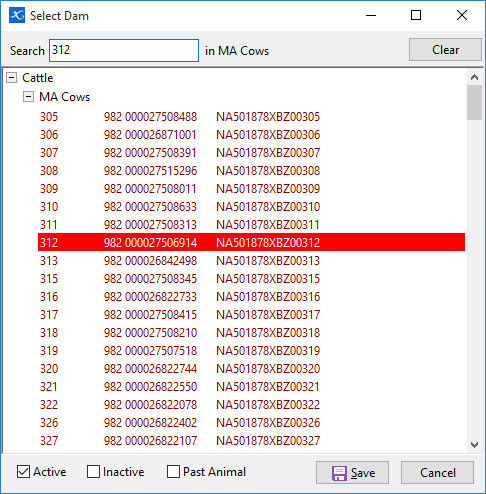
•You can select the individual animal or class by clicking on the animal/class. It will highlight in red. Alternatively you can type in the search field at the top of the window to locate an animal. To activate this search field you need to expand the class of the animal for which you are searching.
NB: Please note the Sire will Auto-fill if the Fill Down is selected. •When the animal or class is highlighted, click Save. •Repeat these steps for all other progeny in the grid. When finished, click Save. NB: A record will be created in the Dams history with a progeny identifier and the progeny will have a birth record with the Dams identifier. NB: To remove an animal from the grid, double right mouse click on the animal and select Delete Row. |
or
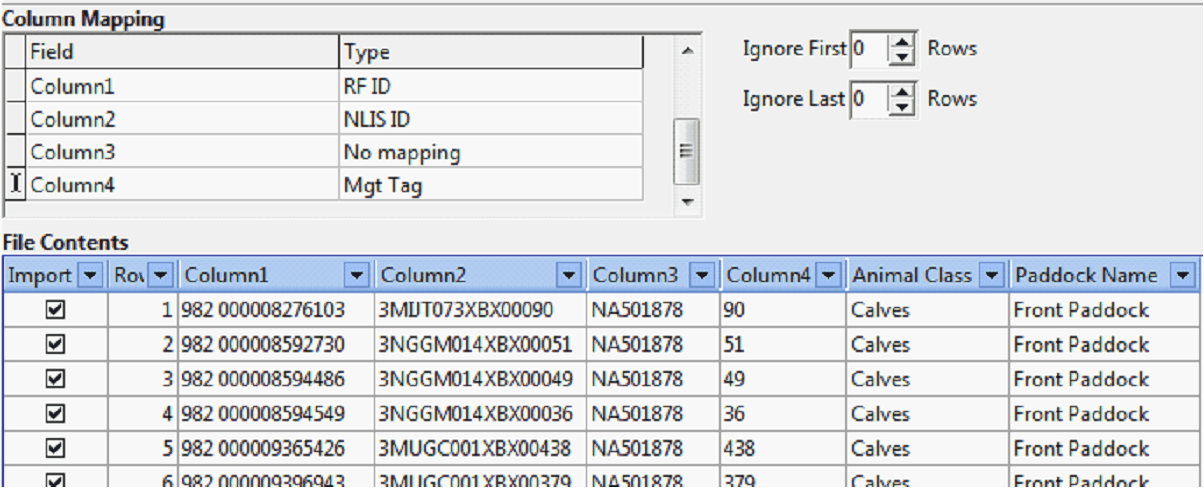
•Click •The Births entry screen will be displayed in the Activity Panel. •Select the date. •Click the •Browse to the file containing the animals that were born, Click Open. The file will need to be in .csv or .txt file format. If the file is not visible check the File of Type selected at the bottom of the window. •The next window is the File Import window. The contents of the file will be displayed at the bottom. As there are a multitude of file formats, you will need to map the columns in relation to their contents. The RFID and NLISID columns by default should already be mapped. If the file contains headers or other sundry information at the top, you can select the number of lines to ignore at the top and bottom of the file. Type the number of lines into the respective Ignore fields.
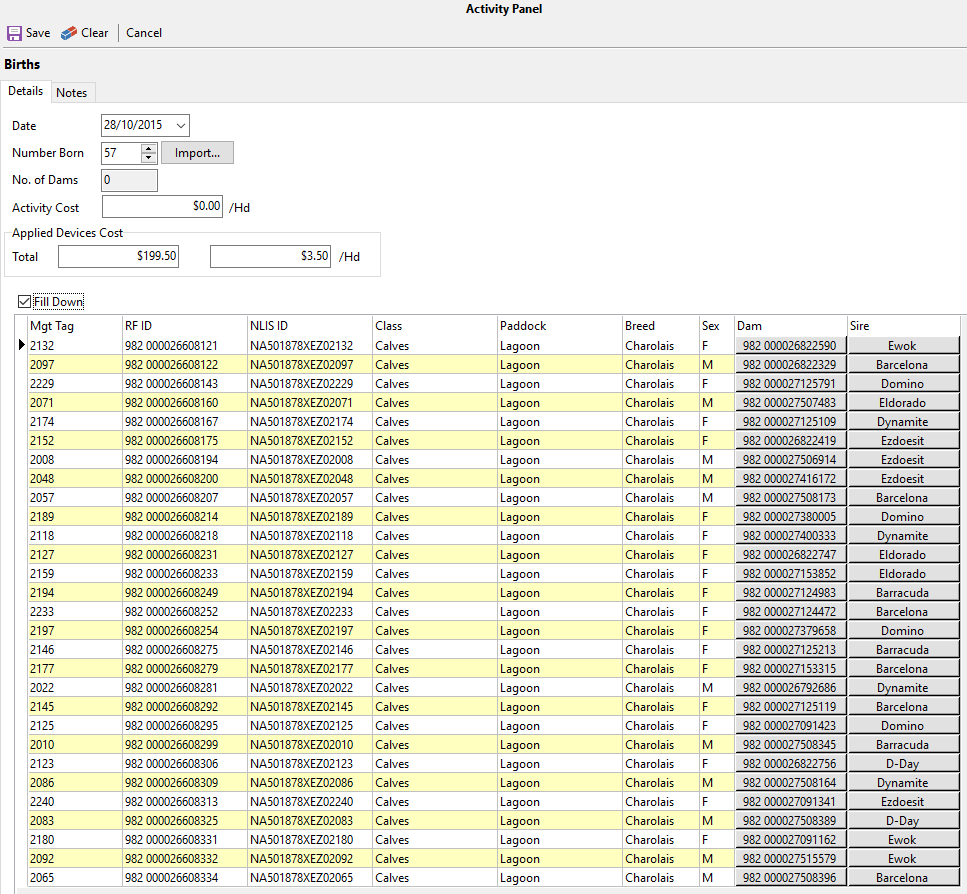
•In the Column Mapping section there is a list of columns. Click in the adjacent cell to be presented with a drop-down list of headings. Select the heading that defines the content of that column. Repeat for each column that is relevant. Not all columns have to be mapped. •Select Class and Paddock from the drop-down list by clicking on the respective cell. NOTE that it will Auto-fill Down for all the animals. If any of these need to be edited, untick the Auto-fill Down for individual editing. •When finished, click OK. •You will be returned to the Births Activity window that will be populated with the imported information.
•If you attribute a device/identifier in this birth process, you can add the cost of the identifier in this birth process. •If not identified in the file import, select Breed and Sex from the drop-down lists found in the cells (These fields are optional). Again, note the Auto-fill Down. •To select Dam and Sire, click on the corresponding cell to launch the Dam/Sire selection window.
•You can select the individual animal or class by clicking on the animal/class. It will highlight in red. Alternatively you can type in the search field at the top of the window to locate an animal. To activate this search field you need to expand the class of the animal for which you are searching.
NB: Please note the Sire will Auto-fill if the Fill Down is selected. ·When the animal or class is highlighted, click Save. ·Repeat these steps for all other progeny in the grid. When finished, click Save. NB: A record will be created in the Dams history with a progeny identifier and the progeny will have a birth record with the Dams identifier. NB: To remove an animal from the grid, double right mouse click on the animal and select Delete Row. |
©2025 AGDATA Holdings Pty Ltd trading as AGDATA Australia

 Trans on the Toolbar and select Births.


 button to import the file.

