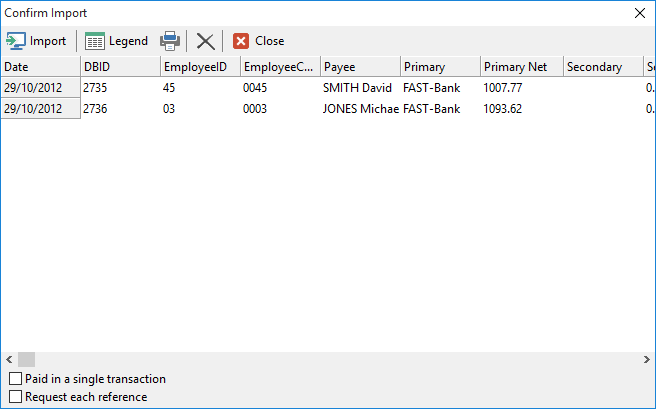
To start the processing you first click on the Payroll menu option, select Third Party Payroll and then choose Import e-PayDay Payroll.
A "Confirm Import" window will appear with each employee’s details (Gross, tax, super, etc) for you to check and confirm.

At this stage you have two options. These are displayed at the bottom of this window;
Paid in a single transaction: You can choose to have all employee’s wages imported into one transaction instead of one transaction for each(e.g. if using EFT Payment then the one transaction for each option could be chosen). To choose to import into one transaction, click on the box beside "Paid in a single transaction"
Request each reference: You can choose to confirm or change the references that will be attached to these wage payments. That means by default if you are paying more than one employee then once you have entered your first reference number in Phoenix will increment one on from this for every employee e.g. B Martin can start with cheque no. 122189 then F Smith will have cheque no. 121190.
If you choose to enter each reference number yourself, as they do not follow one after the other, then Click into the box beside "Request each reference".
 When you have confirmed the details and revised the two options above, Click on the import button in the top left hand corner of this screen. If successful the pay run has been imported.
 The Legend button displays a legend to explain any errors that may have occurred during an import. This will only be necessary after a failed import. In this case, the import window will display transactions in different colours on the screen.
 The Close button will abort this import, but leave the file waiting to be imported later.
 The delete button will clear the entire payroll file. No information will be imported. Only use this if you need to start the import process from the beginning and there are entries you no longer require.
Deleting an entry from a Pending Payroll Import You can remove a line from the pending import file by right-clicking the mouse on the row and choosing "Delete" from the pop-up menu. The row will be highlighted in red to indicate that it won't be included in the import. You can change your mind and right-clicking the row again and choosing "Restore". The action won't take place until you proceed with the import. |