Once the elevation data has been imported, the project can be viewed in 3D. To toggle the map view between 2D and 3D, click the 2D/3D drop-down that appears at the top of the layer menu.
Only the map extent view will convert to 3D view when selected. Ensure the zoom extent of the project is set before selecting the 3D mode.
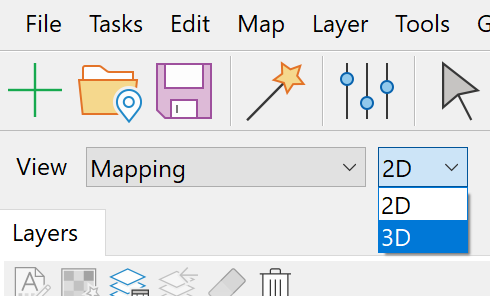
The 3D navigation panel will appear on the right hand side of the map window and the cursor will convert to a four arrow symbol.
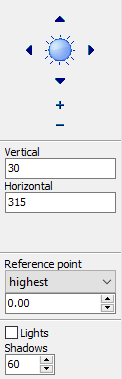
The arrows and +/- : The arrows navigates the 3D view. The +/- alters the zoom. Clicking on the centre icon cycles through the 3D view functions.
 Rotating the 3D view
 Sets the position of the project in space (XYZ position)
 Sets the camera angle
 Sets the sun position which affects shadowing. The Lights option needs to be ticked to see the effect of this option.
Vertical, Horizontal, Distance: Is the position or coordinates in space from which the project is currently being viewed
Reference Point: Sets the centre point of rotation in relation to the DEM
Lights, Shadow: Turns on the shadowing effect of the sun
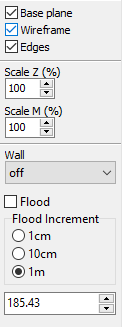
Base Plane: Turns on a grid plane underneath the DEM
Wireframe: Converts the DEM to a wire mess effect
Edges: Provides a smoothing effect of the DEM
Scale Z: Enables the exaggeration of the elevation
Wall: Turns the DEM from a single plane view to a block form view
Flood: Enables an inundation modelling across the DEM