This section relates to legacy Aged Trading accounts that were used in Version 5 of Phoenix and earlier. See Legacy Aged Trading Accounts |
Invoices are entered as transactions against Customer accounts.
1.Click the  button to display the Statement View for customers.
2.Select the particular customer from the Account selection menu.
Remember that you can search for the customer either by typing a few characters from the name, or by typing the account number for the customer.
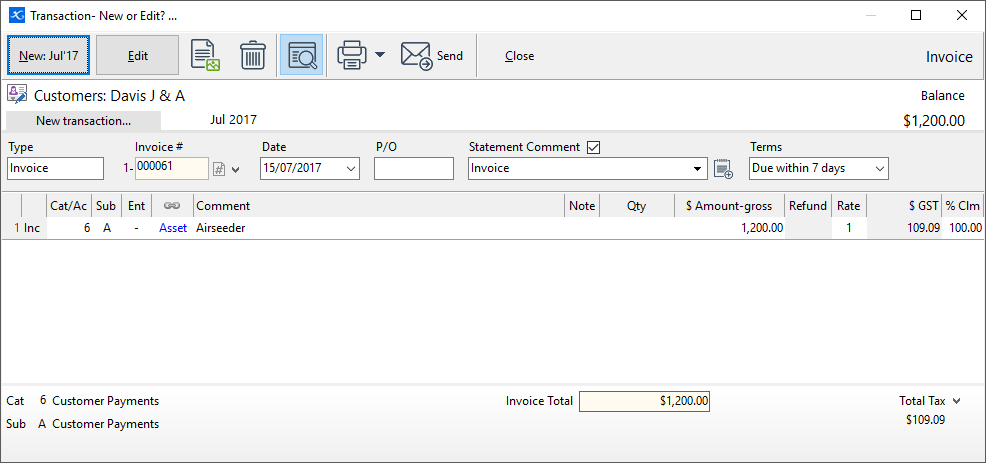
3.Click New for a new transaction. The transaction entry window is displayed over the Statement View…

4.Select the Invoice Type.
5.You do not enter an invoice number if, in Account Set Up, you selected a Phoenix Book number. Phoenix allocates the next Invoice Number for you in the Num field. Alternatively, you can choose hand-written invoices that require you to enter the invoice number. See Customer Document Numbers for more information.
6.Enter the invoice date. If the date is not in the period selected, a warning message is given to alert the user the date is not in the same period.
7.Enter a Comment for this invoice to appear on the statement. You can type a new Comment, or choose from one previously entered.
Phoenix automatically saves every statement comment you enter while the tick is shown next to Statement Comment. You can then select from past comments when entering a new transaction. In fact, as you begin typing a new comment, Phoenix automatically searches the past comments for you, highlighting any that match what you have started to type.
You can click Statement Comment to remove the tick and prevent Phoenix from recording your comments if you wish. You can also control whether statement comments are recorded by selecting the Options item of the Tools menu. Note the “Save Statement Comments From Transaction Entry” shown on the Set Phoenix Options dialogue.
8.Terms are only used when you wish the customer to pay the invoice directly, rather than waiting for a statement. “Terms” allow you to include the payment terms on the printed invoice. These terms include, “Due on delivery”, “Due in 7 days”, and so on.
You can change the Terms offered here by choosing “Customer Messages” under the Setup menu.
9.Details for the dissection items part of the invoice are entered in much the same way as normal transactions are entered.
Remember that these are accrual accounts, so you allocate the sales directly to income categories when entering the invoice.
10.You do not need to enter a total for the invoice since Phoenix calculates the total for you at the bottom right-hand side.
11.Save the transaction by either pressing the Alt + S key combination, or by clicking the Save button.
12.You can immediately print the newly entered invoice.
Click the Print button.
Select Print Invoice from the small drop-down menu that appears.
13.Press the Esc key to exit out of the invoice back to the statement.
14.With the invoice selected click Print and Preview to view the invoice in the print format. If required the invoice can be Printed, Saved or Emailed from here.
Note: Phoenix records when an invoice, credit note or receipt is printed. Phoenix warns the user that the invoice has already been printed before editing.