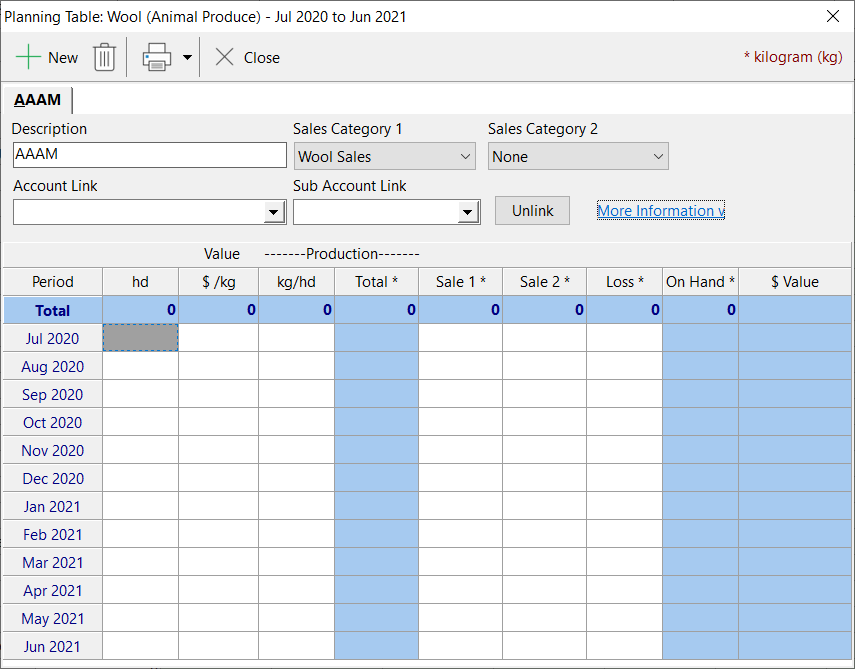
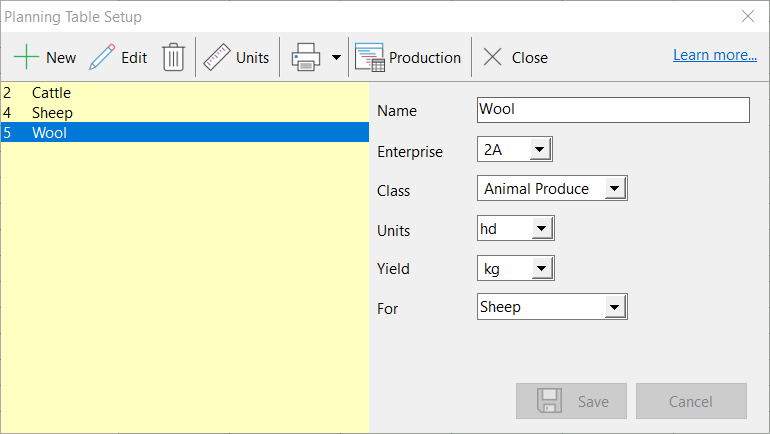
Production data for a planning table can be entered either from the Set Up Planning Tables window, or from the budget screen. From the Set Up Planning Tables screen, highlight the appropriate table, and click the Production details button. Alternatively, from the budget screen, right click on the appropriate production line, and select Production, or select the appropriate production line and press F7.

For a given animal produce planning table, we can plan for a number of different produce classes. Each class is represented by a planning table member. At least one member must be named in each planning table. Do this in the Description field.
In the Sales Category 1 field, select the income category that is used for produce sales within this member. Optionally, and only if some sales are made through an alternative category, select the alternate category in the Sales Category 2 field. (Note that a sales category only needs to be entered if a sale of the produce is anticipated for the budget.)
To define further members, click the new item  button, and enter a new description and details. You will see the different members represented as tabs at the top of the window. button, and enter a new description and details. You will see the different members represented as tabs at the top of the window.
Power Budgets Only: If Physical Accounts and Sub-accounts have been set up in the Financial module for Livestock Produce it may be possible to link Planning Table members to an Account/Sub-account. If links have been set up and are no longer required the Unlink button can be selected. By clicking on the More Information button detail about what the links are used for can be seen, as in the screen shot above.
The links can be used to update the information in the Planning Tables with actual data from the Livestock Produce accounts if required when using Load Projected by selecting Retain and update planning tables in the Select Actual and Budget Data window. The Planning Table data will be overwritten with transactions from the Livestock Produce Account/Sub-accounts for the Actual period selected.
For each planning table member, the production information needs to be entered in the bottom part of the window as follows:
1. The first column allows you to define the number of head used to produce this class of produce. The number may remain constant over time, or it can be varied to according the season, or growth of the animals.
•Put the cursor in the column on or before the month when stock numbers will be present for this member.
•Enter the initial number for this member. Note that the number is repeated down the column showing that it remains constant at the initial setting.
•If the number will change during the season, put the cursor on the month when the change will take effect, and enter the new number.
2. The second column is for the value of the produce in the member. Like Number, this can vary over the duration of the budget.
•Put the cursor in the column on or before the month when produce will be present for this member.
•Enter the initial value for this member. Note that the value is repeated down the column showing that it remains constant at the initial setting.
•If the value will change during the season, put the cursor on the month when the change will take effect, and enter the new value.
3. The third and forth columns are for Yield and Production in this class.
•Put the cursor in the third column on the month when a yield will occur for the member.
•Enter the anticipated yield for the month in the units displayed at the top of the column. Note in the Total column, the production for the month will be calculated and displayed.
•Repeat for any other months when a yield will occur.
4. Entries in the Sale 1 and Sale 2 columns will be made using worktables.
•Put the cursor in the appropriate Sale column on a month when income from a sale of the produce is anticipated.
•Call up the worktable either by pressing F8 (worktable), F2 (edit) or by right clicking the mouse and selecting Worktable.
•Fill out the worktable for the sale as anticipated.
5. If any loss of this class of produce is expected, then entries can be made in the last column to reflect this.
By clicking on the tabs at the top of the window, enter the production data for all members of this table.
|
 button on the toolbar.
 to define a new planning table.
 to define new units. See Units for details on setting up units.
 to define new units. See Units for details on setting up units.

