Reports has its own button on the Toolbar, as well as being accessible from the Tasks menu. Reports is for easily generating timely, useful reports that help you keep control of your business – such as identifying potential problems and highlighting new opportunities.
When selected, Reports shows all the report types available from the program:
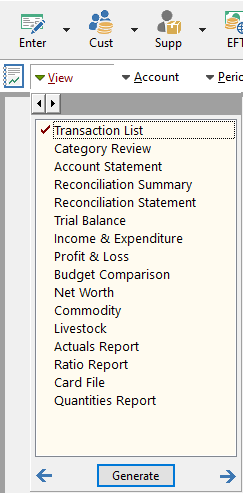
The View button lists the reports available. From the list presented, select the type of report you desire. When you click on Generate, the chosen report is created on the screen, showing all accounts with all groups, all periods, all enterprises and all categories. You can customise your report precisely, selecting one or more of the possible choices on the Selection bar or using the arrows either side of the Generate button: Account, Period, Enterprise, Group, Category and Options. When you have tailored it to your needs, Generate to create the report.
Note that the information choices available vary depending on the report types selected, to ensure that only relevant selections are possible. For example, a Trial Balance report allows only Account and Period, since no other selections would be useful for this report.
The selections in detail:
View - This button displays the list of report formats. Choose a report format and a tick will appear beside the new report type.
Account - Click this selection and see all available accounts. Choose from this list of accounts menu that you wish to report on, by deselecting (clicking on the box beside) those accounts you do not want in the report. Note, when you deselect, how the tick disappears from the box directly to the left of the account in question. A shortcut to unselect all accounts is to click on the right mouse button that displays a popup menu and choose to select or unselect all accounts or to select Cashflow (Open) Accounts Only.
Only the accounts with ticks are reported on.
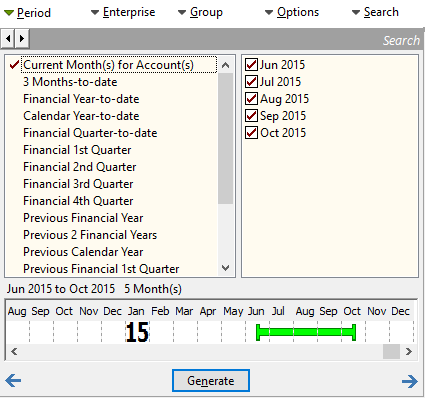
Period - Clicking this selection gives the option to report on Current Y.T.D., Current Period, Previous Financial Year or User Specified Period.
The Current Period is the default option and reports the current data for the report type selected, based on the transactions that have occurred in the current business year, up to and including the current period. It will use the chosen year format – financial or calendar – according to the choice you made in Company Information when opening your Phoenix set of books.
The Previous Financial Year will automatically choose the financial year prior to the current year in your set of books.
The User Specified period is a powerful option that lets you choose the periods over which you wish to report. This option uses the Phoenix Time scaler (see Day to Day Tasks) by dragging the ends of the green bar shorter or longer, and at either end, to determine the report period. A set length of months can be moved from one period to another (e.g.. March to October can become April to November) by dragging the entire line with the mouse pointer on the centre of the bar.
Enterprise - Make this selection to reveal all of your enterprises as set up in Phoenix. To choose only the desired enterprises for your report, deselect (click on the box beside) those enterprises you do not want in the report. When you deselect, the tick disappears in the box directly to the left of the enterprise in question. Use the pop-up menu to select/deselect all enterprises. Click the right mouse button to display the pop-up menu. Enterprises with ticks are reported on. If the "unallocated" option is selected your report will include transactions where no Enterprise has been specified.
Group - When you select this option, all groups in your set of books are shown. As described in Account and Enterprise sections above, you deselect those groups you do not want in the report. Groups with ticks are reported on. If the "Unallocated" option is selected your report will include transactions using categories which have not been allocated to a Group.
Note: At any time, you can change the categories included in a group by altering the category details. Select the Category button on the Toolbar.
Category - Make this choice and Phoenix, as a default, selects all of your categories. As described in Account, Enterprise and Group sections above, you deselect those categories you do not want in the report. Categories with ticks are the ones reported on.
Options - This feature presents the user with report options. The specific options presented vary according to the specific report selected. The main options available are to Include or Exclude GST, data sort options and showing sub-categories and sub-accounts in the report. On reports where the Comments field is seen you can also select to Wordwrap Comments to show the full Comment used in the transaction and to show Dissection Notes.
Search - This feature is only available in Transaction List. It allows the user to specify particular transactions to list. See Transaction Search.
Once you have made your choices and Phoenix has generated the report for you, the report taskbar gives various options to move through the report, zoom in and out, Print, Save the report to file and Email the report.
The report is printed, saved or emailed in the same format that it appears on-screen.
See Also: