|
Navigation: Financial > Day to Day Tasks > EFT Payments Notifying your EFT contacts |
Scroll Prev Top Next More |
If you are choosing to notify your Suppliers through fax, you must have the appropriate hardware to do so. You need to have a Data/Fax Modem that will handle a fax class 1, 2 or 2.0. Talk to your hardware supplier if you are not sure if your modem complies. Phoenix deals directly with the hardware which means you don’t need any third party software.
If you are choosing to notify your suppliers through Email, your system must be MAPI compliant or you must configure Phoenix to use another email application. See Configuring Emailing for more information.
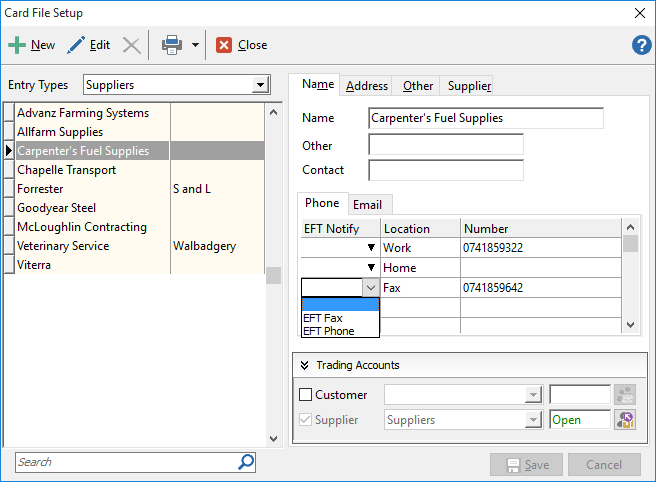
The Other tab in the Card File is used to record sundry information relating to the person or organisation. Much of this information relates to the EFT (Electronic Funds Transfer) process. The Address tab in the Card File records not only the address details but has the EFT Notify check box if BSB and Account numbers have been recorded. If EFT Notify is ticked, an extra column is added to the Phone and Email tabs under the Name tab. Enter the following information relating to each Supplier/employee in the Card File that you plan to pay by electronic transfers. BSB - This is the Bank – Sub Branch number of the Supplier's/employee's financial institution where the deposit is to be made. This number will be 6 digits with a hyphen in the middle. Account Number - This is the Account number of the Supplier's/employee's account where the deposit is to be made. It should not include any spaces, hyphens or other punctuation. If an account number is not entered, there will be no option to notify. Reference - This is a reference code or number that this Supplier/employee will recognise as relating to your company. They will see this reference on their bank statement after you have made an electronic payment. If this is left blank, then Phoenix will prompt you for a reference when you run the EFT Notify task. EFT Notify - If the Supplier/employee you are paying electronically wants to be notified when you have made a payment to them you must tick the EFT Notify check box under the Address tab and then complete the appropriate details under the Phone or Email tab under the Name tab. See Notify Method below. Notify Method - Select from the options under Phone or Email on the Name tab in the Card File, the method you wish to use when notifying the Supplier/employee that a payment has been made electronically. The options available are: Email - Select EFT Email from the Email tab of the Card File and enter in your Supplier's/employee’s address e.g.. address@isp.com.au Phone - Select EFT Phone from the Phone tab of the Card File and enter in your Supplier's/employee's phone number/s. Fax - Select EFT Fax from the Phone tab of the Card File and enter in your Supplier's/employee’s fax number/s. Mail - Tick the EFT Notify box under the “Address” tab of your Card File ensuring you are choosing the right type of address (e.g.. Postal, Street or Home) Note: if you have entered multiple fax numbers, email or postal addresses then multiple options will be available for selection. If no contact details have been provided then the Notify Supplier feature will not be available.
See also: Setting up Card File |
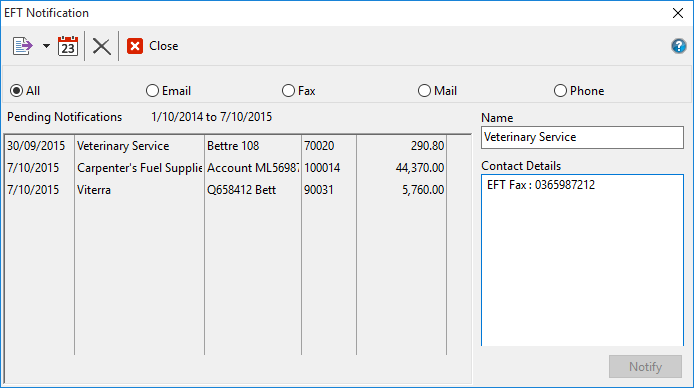
After you have generated your payment file, transferred the details to your bank, and closed out of the EFT Payments screen, Phoenix will ask if you want to Notify Suppliers Now. If you click Yes, Phoenix will display an EFT Notification screen.
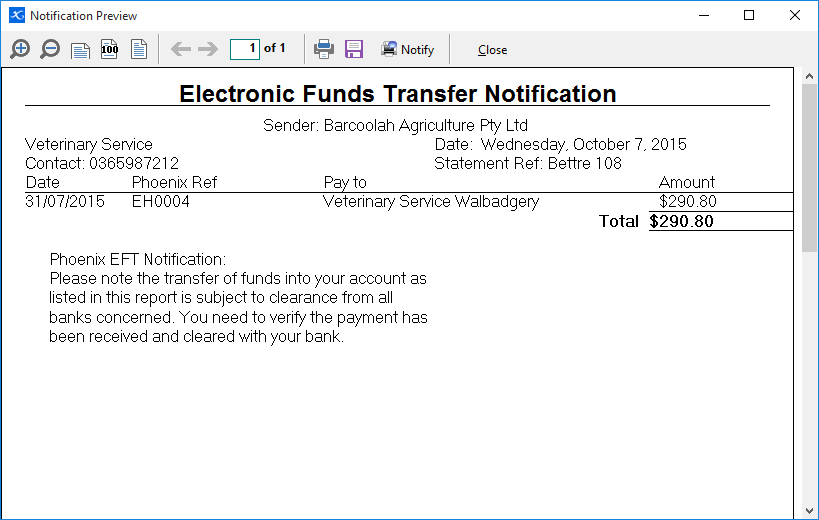
If you click No you may want to access the notification screen (shown above) at a later date. You will find this by clicking the drop down arrow to the right of the This screen will show your outstanding EFT Notifications. The suppliers will be displayed in this window depending on each different transaction. This means you will possibly notify the same person on the list more than once if you have paid them through more than one transaction. However when the actual remittance is created, there will only be one remittance per Supplier. From this list select the notification method and then click on the Notify button to produce the remittances. If you are happy with the preview of the remittances, the process to actually send the remittance differs depending on how you are notifying them. Note: If you have more than one Supplier you can use the arrows to navigate through the different remittances. Email - Click on the Email button to send the remittances. Fax - Click on the Fax button to send the fax to your Suppliers. A status report will appear to show you if the faxes are sent or rejected. Mail - Click on the Print button and post the remittances. A Date Range button is available for you to choose the period to display this list of notified and notifiable Suppliers. The default date is the current day back to one year prior (e.g.. If the current date is the 13/06/12 then it will show you from 01/06/11 through to the 13/06/12) The Reverse button is then offered as a way of notifying again those notified already. A disclaimer is provided on the bottom of all remittance statements An example of a Remittance:
After the remittances have been created you will be asked if you want to update the records to indicate notification has been completed. If you choose Yes the supplier will no longer appear as a current contact that needs to be notified. If you choose No this will indicate either something went wrong with the fax, phone, mail or email process and you need to repeat the notification process. This will leave the Supplier\employee on the list so you can generate the notification again when required. |
Editing the Disclaimer After your first Email remittance statement has been created, a disclaimer file will be stored in your program directory. If you wish to edit or add to this file, when Phoenix is installed following the default installation, the file will be found in: C:\Program Files\AGDATA\Phoenix 6.0\Disclaimer.txt Double click on this file to edit or add to the text. Working with a Fax Cover Sheet If you wish to create a fax cover sheet, a "Faxcover_v8.png" file can be created in an image program (e.g.. Microsoft Paint) which will be faxed along with your remittance statement. You will need to create a file called “Faxcover_v8.png”. This file must be saved to the program directory. If Phoenix is installed following the default installation, the file will be saved in: C:\Program Files\AGDATA\Phoenix 6.0\Faxcover_v8.png Once that file has been created, Phoenix will convert this file into a recognised fax cover sheet called "Faxcover.apf". If you need to edit or add to the original fax cover sheet, the "Faxcover.apf" will need to be deleted before you make any changes to the "Faxcover_v8.png" After changes have been made and saved the converter will create the "Faxcover.apf" file again. |
©2020 AGDATA Holdings Pty Ltd trading as AGDATA Australia


 button or under the