|
Navigation: Financial > Day to Day Tasks > EFT Payments Making Electronic Payments |
Scroll Prev Top Next More |
There are three steps involved for uploading EFT Batch Payment files created in Phoenix to your bank:
The first phase of this process is entering the transactions for the payments you want to make. These transactions are entered just like any other transactions. 1.Click the 2.Select the appropriate account and period if necessary. 3.Click New to begin entering new transactions. 4.Select EFT Payment for the transaction Type. 5.Leave the transaction Reference blank or insert an asterisk. To leave the reference field blank, do not press the space bar as this inserts a character that you cannot see but still causes problems for the payment process. 6.Select the Payee from the Card File. 7.Enter and save the rest of the transaction as though the payment were already made. 8.Repeat for as many payments as you wish to make. |
The second phase is to ask Phoenix to generate an EFT Payments file to import into the bank's internet banking web site or for your bank’s online banking software, to complete the payments. 1.Click the
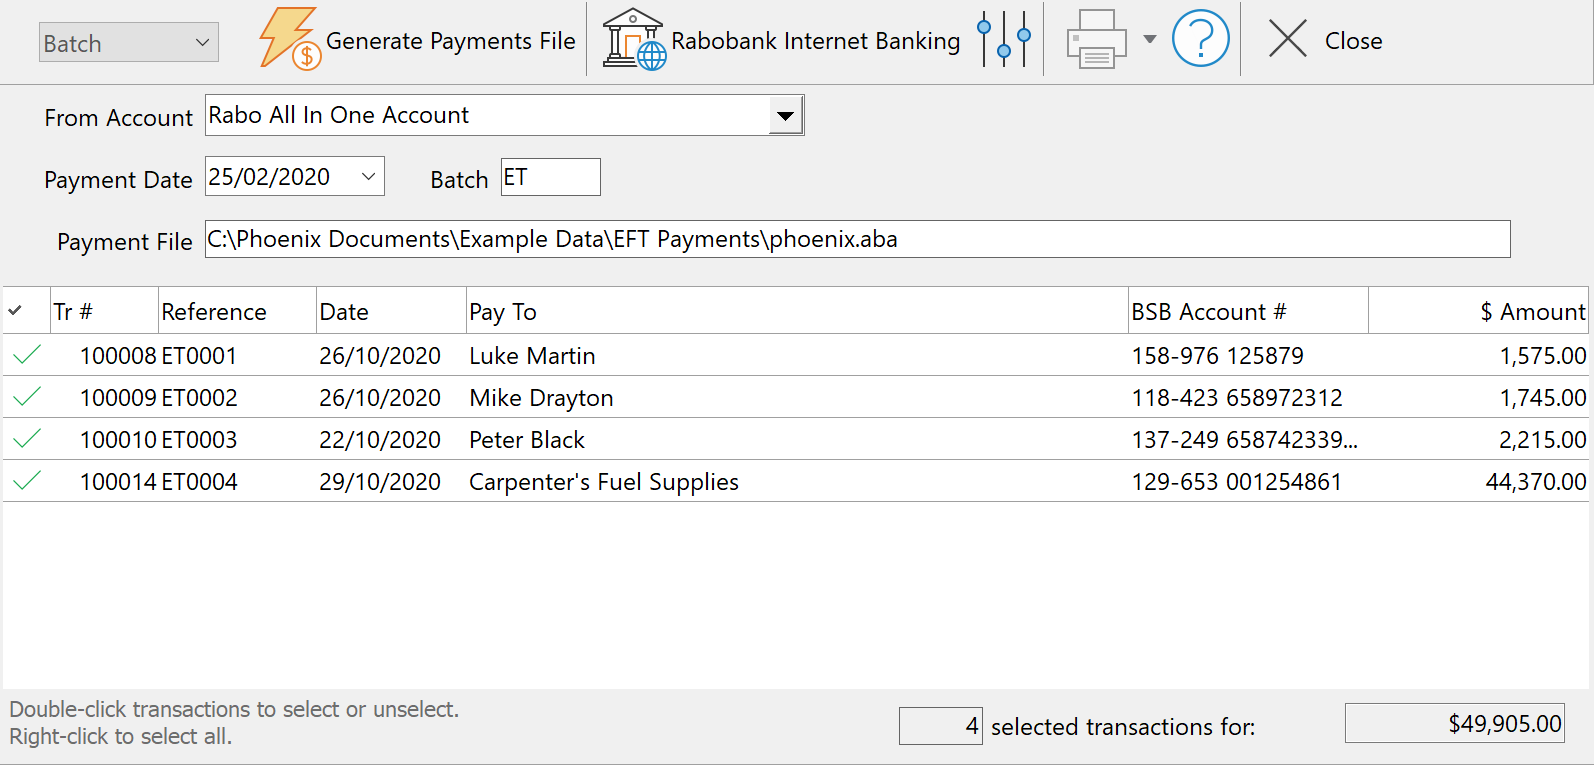
2.Verify that the correct account and period are selected. 3.Confirm the Payment date. You can specify a date later than today's date if future payments are required. If you specify a date earlier than today's date, your bank will reject the payment file. 4.Note the Batch number Phoenix will apply to all transactions included with this payment file. 5.Note where the Payment File is going to be saved. 6.Select the payments that you want to make by ticking the transactions on the list provided. You tick or untick a transaction by double-clicking on it. You can select all the transactions by right clicking to display the local pop-up menu and choosing Select All. 7.With all of the required transactions ticked, click the Generate Payments File button. 8.If a previous EFT Payment file exists on the computer, Phoenix displays details of that file before overwriting it. You should ensure that the previous file has been processed before overwriting it. 9.After generating the payments file, Phoenix offers to start the bank’s program. This is possibly a convenient time to go to Step 3 three. 10.Phoenix will also offer to print the EFT Batch details. 11.Upon closing the EFT Payment window, Phoenix will prompt you to notify the people you have paid. See Notifying your EFT contacts for more detail.
|
The third phase is importing the file through your banks website or running the bank’s program to actually send the file to the bank so the payments selected can be made as per the information in the Payment file. Phoenix generates the Payments file and saves it in the location you specified in EFT Payments - Setup but does not take any action about sending it to the bank. You can connect to the bank site or banking program when prompted by Phoenix or you can choose not to process the payment file at that time and go back into EFT Payments later and click on the Bank button. Alternatively, you can go to your bank site directly through your internet browser without even having Phoenix open. 1.After generating the Payments file, launch the banks website or start the bank’s program. 2.Follow the banks instructions. |
See also:
Reconciled Account Transactions
Reprocessing your Last EFT Batch
Getting Ready to Make Payments Electronically
©2020 AGDATA Holdings Pty Ltd trading as AGDATA Australia

 button on the
  button on the