|
Navigation: Financial > Configuring Financials > Setting Up Accounts > Set Up Customers & Suppliers Set Up Supplier Accounts |
Scroll Prev Top Next More |
There are three steps required to be able to track Supplier Invoices and Payments in your Phoenix Set of Books:
1.Click the 2.Select the Customer & Supplier Tab. 3.Click the 4.Type in a name for this account. e.g. Suppliers. 5.Set the Type to Supplier 6.A selection box for GST tracking is displayed if GST has already been enabled. Select the appropriate method for tracking GST. If GST has not yet been enabled this selection box will not be visible and the method of tracking can be selected when enabling the GST tracking. See Setup GST Tracking for details. Please note that if GST tracking has been enabled, the default setting will be “Full Tracking”. You may find that this option is initially greyed out for the first account you create when going into “Set up Accounts”. Once you save this new account, the option to change will be available. You can then make and save the change. 7.Set the Payment Terms for this account which will be the default for all Sub-accounts. 8.Define invoice stationery for this account which will be the default for all Sub-accounts. 9.Click the Sub-accounts button to set up the sub-accounts. Sub-accounts are the individuals or businesses who are your Suppliers. |
Once you have created a Supplier Account you can now set the individual sub-accounts. Sub-accounts are the individuals or businesses who are your Suppliers. 1.Click 2.Type in the Name details (which includes Phone and Email). 3.When setting up a supplier, check the appropriate box at the bottom of the screen. 4.Click the Address tab to complete the address details. The postal, street or home address can be entered here. There is an extra tab at the bottom of the page if more than one address needs to be entered. Whatever location is selected, the tab will be re-named to show the address location. 5.If desired, you can then click the Other tab and add bank account details, GST Registration (ABN) number and some notes. You must enter the bank account details if you wish to send payments to this client electronically. 6.Click the Save button to add the new entry to the left hand list in alphabetical order. 7.An extra tab now appears which lists the default terms for the entire Supplier account. 8.Before any transactions can be entered for any Suppliers, the account needs to be opened. On the Name tab, click the button to the right of where it says Not In Use. 9.Repeat this process for any new Suppliers you wish to create.
NOTE: If the person or organisation you wish to set as a Supplier already exists in your Card File, change the Entry Types View to All Card File Entries. You can then select the Supplier tick box to set the Card File entry as a Supplier.
You can also add further Suppliers directly from the Card File without opening Account Setup. See Setting up Card File |
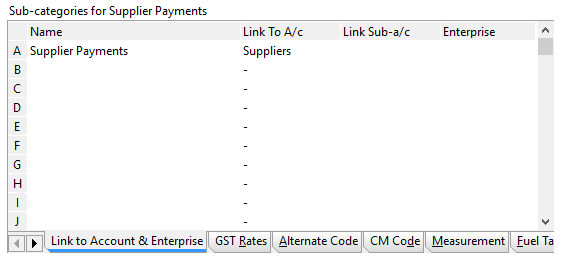
When you pay a supplier, the payment must be recorded both against the supplier sub-account and the bank or other account from which the payment was made. That is, from a Phoenix record keeping point of view, a payment is simply a transfer between a reconciled account and the supplier sub-account. Payments would normally be recorded by entering a withdrawal into the bank or other reconciled account. In the dissection lines of the withdrawal transaction, link to each supplier sub-account to which each payment was made. You can create a special Supplier Payments category to automate this linking of payments with the supplier sub-accounts. In the Category setup window create a new expense category called Supplier Payments, as follows: 1.Click the 2.Select and double click on an appropriate blank category on the displayed list. 3.Type in a name for the category. e.g. "Supplier Payments". 4.Select Expense as the type for this category. 5.Allocate the category to groups if required. 6.Setup sub-category A and call it “Supplier Payments” (or similar to suit your needs), and set the Link to A/c to your supplier account. Leave Link Sub-a/c blank since you will choose the sub-account when making the transaction entry.
7.Save and close the Category Setup window. If you use a Category that has an automatic link to a Supplier account for entering payment transactions, the Link to Sub-a/c field is automatically populated based on the Supplier you select in the From/Pay To field in transaction entry. When linking a dissection to another account you are shown the balance of the destination account as well as the last entry to that account. For further information on setting up categories, see Setting up Categories. |
©2025 AGDATA Holdings Pty Ltd trading as AGDATA Australia

 button on


